How to set up and promote the perfect virtual event or webinar
In recent months, we have hosted several successful virtual events and we want to share some of the insight that we have learned. There are, of course, alternative ways of hosting these events, but we've found this method has been very successful and, importantly, straightforward.
This blog will help you feel empowered to host your own Zoom webinar or virtual event.
Firstly, let's take a look at the technical set up:
- If you do not already have one, we would recommend setting up an Eventbrite account. Eventbrite is a great event hosting site which also acts as a ticket selling/distribution hub. The helpful thing about this platform (and similar) is that it also acts as a community page for people looking to attend interesting events in their area across a wide spectrum of topics. This gives more people more of a chance of hearing about your event.
- You should create a landing page on your website. If you don't already have an events section on your site, add one. This is a good place to provide more information about the event (who will be speaking, what the main themes will be etc.) You can host an Eventbrite widget on this landing page so people can sign up for the event without having to leave your site. Driving traffic to your website also means you can track this activity and benefit from gaining insight into how your audience interacts with the site.
- A paid for Zoom subscription with the webinar functionality activated is crucial. If your business already has a paid for Zoom account, you can add webinars for the month of your event for a small cost. The dark art of actually hosting a webinar will be a topic for a different blog.
- Within Zoom, setting up the webinar is relatively straightforward. My main tips here would be, make sure you select to record the webinar remotely to the cloud. Add some polls to increase the interactivity of your webinar and also make sure you add your logo to the branding. Setting up the Zoom bridge initially can be a bit fiddly. We can help clients with setting this up and managing it during the session, but when you've set it up once, the template can be saved and be ready to go for all future webinars.
- A Zapier account is a very handy tool. Essentially this links your Eventbrite account with Zoom, ensuring that every attendee who registers for a ticket automatically registers on Zoom. This also keeps the non-ticket registering riffraff out.
Follow these steps, and your event should be ready to go. Now time to actually get potential attendees to sign up!
When it comes to promoting the event, these are core steps to follow:
- Socialise! Promoting your event from your company social pages is very important. Depending on how your sign-up rates are going, you should look to boost your posts as ads, so more eyes see your event. There is no hard and fast rule about how often you should be posting, although we would recommend two to three tweets a week and one to two LinkeIn posts in the build up to an event. You should also encourage all your team members to share news of the event on their personal profiles. This type of personal endorsement usually goes a long way towards helping with sign-ups!
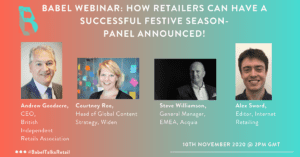
- To make your posts really pop, you should consider creating 'social tiles'. These are custom images created to act as digital fliers for your event. If you happen to have a Photoshop whizz in your ranks, feel free to let them loose on this task. A cheaper and easier alternative that a lot of social media pros will swear by is Canva. This website has a huge selection of customisable templates created by designers which allows you to make your own images and videos. You can easily 'design' beautiful tiles that will add a splash of colour to your event and crucially make it stand out in your potential attendees' timelines. The type of tiles I would recommend are ones which show who your panellists or speakers are, as well as the countdown style e.g. One week to go, one day go. Check out this example tile:
- One word of caution on using any tiles/images for your social posts, keep an eye on the formatting. For Twitter you need your images to be 1100 x 628 pixels, for LinkedIn they should be 1200 x 628 pixels. Stick to these sizes and your images will look good on mobile, tablets and computers.
- Mailers are another crucial step for getting the right bums on the right virtual seats. You need to build lists of appropriate contacts at the companies you want to target. You then need to hit them with regular (but not too regular) mailers telling them about your event, why it will be great and why they should sign up.
I hope this has helped give some insight into how to get your own webinar off the ground. If you would like some hands on support with setting up, managing and promoting your event, please get in touch at newbusiness@babelpr.com